


BMW Side View Mirror Removal and Installation in 1 Minute (F01/F02/F06/F07/F10/F11/F12/F13/F18)
I’ve spent two decades in and around test cars, track days, and more scratched door mirrors than I’m proud to admit. The good news? On these BMW F‑chassis cars, a wing-mirror swap isn’t some dark art. When I tried it the first time on an F10 5 Series after a too-close encounter with my garage, I was honestly surprised—start to finish took me about a minute, and I didn’t even spill my coffee.
If you’ve got a cracked glass, a lazy power-fold, or you just scored a painted cap in the exact shade of Sophisto Grey, here’s the quick, real-world way to handle BMW side view mirror removal without dismantling the entire door. Yes, it applies across the F01/F02 7 Series, F06/F12/F13 6 Series, F07 5 GT, and the F10/F11/F18 5 Series platform.
Watch: BMW Side View Mirror Removal in Real Time
Why do BMW Side View Mirror Removal yourself?
- It’s fast: typically 1–5 minutes once you’ve done it once.
- No full door card removal required on these F-chassis cars.
- Save shop time, paint-match your caps at your pace, and keep the car on the road.
- Perfect for quick fixes before a weekend away or a big night out—no gaffer tape aesthetics.
Tools for BMW Side View Mirror Removal on F01/F02/F06/F07/F10/F11/F12/F13/F18
- Trim tool or a plastic pry tool (avoid metal screwdrivers—saves the soft trim)
- 10 mm socket and ratchet (some cars use Torx fasteners; T20/T30 can show up)
- Small magnetic pickup or a strip of masking tape on your socket (prevents dropped nuts)
- Optional: torque wrench set low (8–10 Nm is a common spec—always check your service manual)
BMW Side View Mirror Removal: Step-by-step in about a minute
- Lower the window. Trust me—it gives you room to work and saves your knuckles.
- Gently pry off the interior sail trim by the mirror (the triangular piece by the tweeter). Work from the top, use even pressure, and don’t yank the tweeter wire.
- If fitted, disconnect the tweeter plug and set the trim aside.
- Locate the three mirror mounting fasteners behind the sail area. On most F-chassis: three 10 mm nuts. Some cars use Torx bolts.
- Support the mirror with one hand from outside. With the other, loosen the fasteners from inside. Last thing you want is the mirror trying to base-jump.
- Disconnect the mirror harness plug(s). Cars with power-folding, dimming, memory, or blind-spot (S5ASA) can have multiple connectors—don’t force anything.
- Lift the mirror away from the door. If the foam gasket sticks, wiggle gently—no need to get heroic.
- Breathe. The hard part’s over. Time for installation.
BMW Side View Mirror Installation: the quick reverse dance
- Seat the new mirror and feed the harness through the hole cleanly.
- Hand-thread the fasteners first to avoid cross-threading.
- Snug the three fasteners evenly. Torque to the BMW spec for your model; 8–10 Nm is typical for mirror mounts, but check ISTA or your service guide.
- Reconnect the harness(es), making sure indexing tabs line up. No force needed.
- Clip the sail trim back, reconnecting the tweeter if present. Press with open palm for an even fit.
- Test: adjust, fold, heat, blind-spot, and memory dip (in reverse) before you drive off.
Coding, torque, and electrical notes for BMW Side View Mirror Removal
- Torque: A small torque wrench set to 8–10 Nm is a safe ballpark, but always check your BMW-specific documentation.
- Coding: Basic mirrors (adjust/heat) usually need no coding. Memory, electrochromic dimming, or power-fold may require a module with matching options. Some owners code the reverse-dip function after a swap.
- Connectors: Don’t mix left/right; harness lengths and pin-outs differ. If you’re retrofitting power-fold, you’ll need the correct switch and possibly FRM/door module coding.
- Painted caps: They clip on, but tabs are delicate—warm the plastic on a cool day to avoid snapping a tab.
BMW Side View Mirror Removal differences by model
- F10/F11/F18 5 Series: Easiest of the bunch—sail trim off, three fasteners, done.
- F01/F02 7 Series: Slightly thicker door trim and more insulation. Take your time with the sail piece; it’s hefty.
- F06/F12/F13 6 Series: Similar to the 5er but watch for extra wiring if you’ve got all the toys (BLIS, dimming, memory).
- F07 5 GT: Access is similar; the sail trim sits a touch lower—pry evenly from the top edge.
How this DIY stacks up vs rivals
| Car | Typical time | Main tools | Notes |
|---|---|---|---|
| BMW F10/F01 family | 1–5 minutes | Trim tool, 10 mm socket | No door card removal. Sail trim access. |
| Audi A6 (C7) | 10–20 minutes | Trim tool, Torx T25/T30 | More clips; sometimes partial door panel loosen needed. |
| Mercedes E-Class (W212) | 10–15 minutes | Trim tool, 10 mm, Torx | Stout clips; careful with tweeter trim to avoid marks. |
Common troubleshooting after a mirror swap
- Mirror won’t fold: Check for the correct power-fold connector and for pinched wires behind the sail.
- Heated glass not working: Verify the two spade connectors on the mirror glass are seated and oriented correctly.
- Wind noise post-install: The foam gasket might be misaligned. Loosen, reseat, and torque evenly.
- Reverse dip inconsistent: Confirm the car has memory seats and that the dip function is enabled in iDrive. Coding may be required for retrofits.
Final thoughts: BMW Side View Mirror Removal made simple
Once you’ve done it, you’ll wonder why you ever booked a service appointment for this. The BMW side view mirror removal process on these F‑chassis cars is refreshingly straightforward, the install is just as quick, and with a little patience you’ll avoid scuffed trim or rattles. It’s a tidy five-minute job that feels like a small victory—right up there with nailing a perfect parallel park on the first go.
FAQ: BMW Side View Mirror Removal and Installation
Do I have to remove the entire door panel?
On these F‑chassis cars, no. The sail trim by the mirror gives direct access to the fasteners and connectors.
What’s the torque spec for the mirror fasteners?
Many BMWs use 8–10 Nm for mirror mounts, but confirm in ISTA or your service manual for your specific model.
Will I need coding after installation?
Basic mirrors usually don’t. Power-fold, memory, dimming, and blind-spot variants may require coding or matching modules if you’re retrofitting features.
Are left and right mirrors interchangeable?
No. They’re side-specific, with different angles, housings, and sometimes connector layouts.
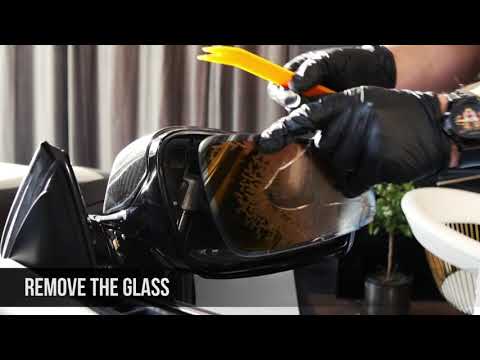
Can I just replace the mirror glass?
Yes. Heated and dimming glasses pop off carefully with trim tools. If the housing or motor is damaged, a full mirror replacement is cleaner.
Premium Accessories for Mentioned Vehicles
Custom-fit floor mats and accessories for the cars in this article